TL;DR
Glucose monitoring devices now allow for glucose concentrations to be measured automatically every 1-15 minutes throughout the day. Mainly developed for the management of diabetes, this type of time-series data has now become useful for the assessment of the impact of certain scientific interventions. The analyses of glucose monitoring data has developed hugely over recent years, from processing the data manually within excel to now processing it using packages within R. This post will be the first of many that I will write, to hopefully help those that want to use this data within research.
Introduction
Glucose monitoring technology has been around for the past 20 or so years for the management of diabetes. In that time, sensors have reduced in size, increased their measurement duration (5-14 days) and reduced their cost. The launch of the Freestyle Libre device from Abbott revolutionized the way that both patients and scientists could use glucose monitoring data, as it reduced the need for calibration and made the technology more accessible, and more importantly cheaper. A review of the technology is beyond the scope of this blog but for a good overview, we would suggest reading the below:
Whilst the use of the glucose data has been primarily focused within the clinical domain, my own research has aimed to demonstrate the physiological consequences of being physical activity within those people with an absence of diabetes. Plainly, this means that I want to see the effect that physical activity has on acute health, and in this case this means glucose concentrations. If you are interested in the topic, I would recommend you reviewing the following of our journal articles:
- Using Digital Health Technologies to Understand the Association Between Movement Behaviors and Interstitial Glucose: Exploratory Analysis (Kingsnorth et al. 2017)
- Examining the Use of Glucose and Physical Activity Self-Monitoring Technologies in Individuals at Moderate to High Risk of Developing Type 2 Diabetes: Randomized Trial (Whelan et al. 2019)
My own research has mainly focused on the use of the Freestyle Libre and so this post and others will focus on the analyses of data collected by that device. Much of the method will be the same for alternative devices but the import process will be different and you must be mindful of the analyses parameters you choose. This post will assume some knowledge about the Freestyle Libre, but will outline the bits of information needed to understand the analyses.
The first and very important aspect we will cover is what the data looks like.
Data structure
The Freestlye Libre historically synced data with a handheld reader but more recently, data from the sensor has been captured by the phone application ‘LibreLink’ and then to the cloud based service ‘LibreView’. The data we will be using has been downloaded from LibreView and stripped of any identifiable information (with consent from the user). I have inserted a screenshot of the file below:
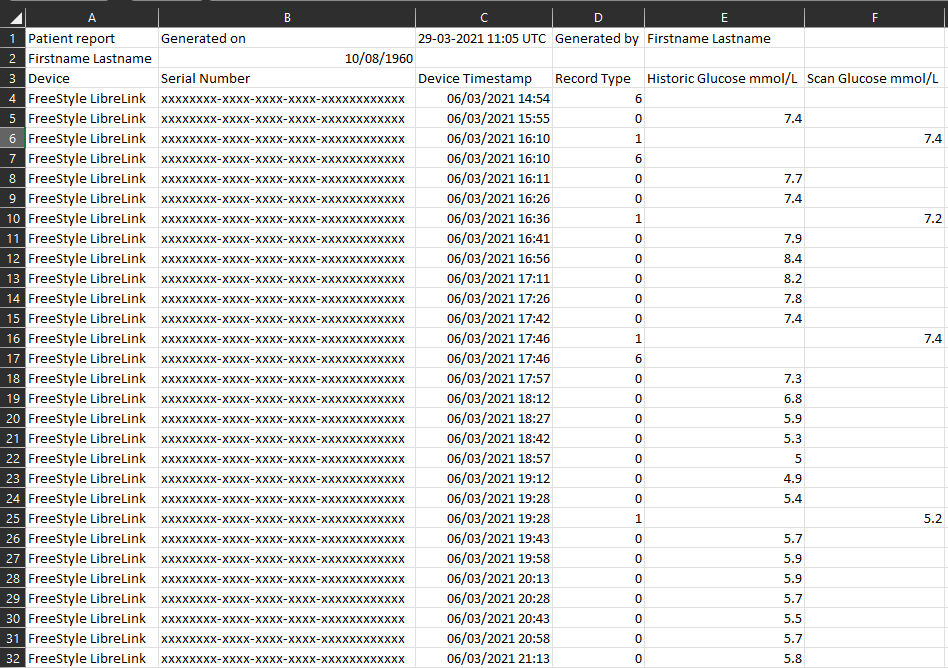
The data is structured in a way that includes a header of information including the patient name, who generated the report and the generation date. There are many columns within the dataset that relate to diabetes care, but the most important ones are:
- Device: this means where the data has come from and in this case, it was from the LibreLink app
- Device Timestamp: the date and time when each reading from the sensor was taken
- Record type: each new row indicates a record and these can relate to difference things such as:
- Record 0 = historic glucose or automatic scan meaning that the device automatically took a reading
- Record 1 = a scan glucose or a user generated scan meaning that the device was scanned manually
- Record 6 = a note from the user
- Historic and Scan Glucose: the corresponding glucose reading for each record type 0 & 1.
There are other record types but these will become more apparent when you become more familiar with the data. When you open the file a bit later on, you will notice that it also includes a number of columns that relates to diabetes care that may or may not be useful. We won’t be covering these items in this post but reach out if you want to know more.
Now we have explained the data structure, the next step is to read the data into R.
Importing glucose data into R
For this exercise we will be using the data shown above in the screenshot. To download the data, please use the below link:
You will notice that it has been labelled fgm and this related to the fact that there are many terms that are used in the literature to describe the devices, but Abbott uses the term ‘flash glucose monitor’.
Now to read the data into R, we use the same code as in the reading data into R post.
gludata <- read.csv("./static/files/fgmdata.csv", header=FALSE)
#The above code is specific to this post
#First, either create a project and move the downloaded file to your project directory or set your working directory where file are located e.g. C:/Users/username/Downloads
#Then use the read.csv code as in the above referenced post
#We have used the header=FALSE option to import the file as it is
If you look at the data frame that has been imported, you will notice that it has imported everything and it isn’t in the best format for R. We must therefore do a bit of tidying before we can process the data:
library(dplyr)
#This needs installing via install.packages if you haven't already got the package in your library

pid <- gludata[2,1]
#This is to extract the participant id contained within the file
#If this hasn't been exported in the file or if you have already removed the header manually, this will need to be specified by pid <- "insert Pid" instead

gludata <- gludata %>%
  mutate(V1 = replace(V1, V1 == "FreeStyle LibreLink", pid)) %>%
  slice(-c(1:3)) %>%
  filter(V4 == 0) %>%
  select(c(1,3,5)) %>%
  rename(id = V1, time = V3, gl = V5) %>%
  mutate(gl = as.numeric(gl)*18) %>%
  mutate(time = as.POSIXct(time, "%d/%m/%Y %H:%M", tz = ""))

#replace replaces the data within the device column with the ID of the file - remove if not necessary
#slice removes the top header rows
#filter select only those historic or automatic scans and the variable name could be different depending on your own data
#select then removes all the unnecessary columns that are not needed for analyses by the iglu package (later on)
#rename changes the names of the variables that are required by the iglu package - this is required because we imported the csv as it was. If you remove the headers manually then these the V1 etc variable names will need to be changed
#as.numeric converts the glucose values that are currently stored as characters to numbers
#because iglu was developed using mg/dl values, our data needs to be converted by x18
#as.POSIXct converts the time and date that are currently stored as characters to a date and time variable
For this data import, we have made the following decisions:
- Only import historic scans: this was a conscious decision because of the way that the Freestyle Libre works. As the user can scan the device manually every minute, this could result in an uneven amount of data points per file per participant. Only including the historic or automatic scans eliminates any particular bias within each file that could influence the glucose metrics we will calculate later on.
- Inserted an ID: we have chosen to manually insert an ID into the file as the way most packages will process the data will recognise this piece of information and summarise the data by it. This also becomes more useful as the package we will use later on can process multiple files (from different IDs) at once, and uses this information to group the information.
- The data has been x18 to work correctly with the iglu package. This will influence some of the results e.g. mean but not others e.g. CV.
Like most things within R, it the above action can be done manually in excel, but processing it through R is so much faster and reduces the possibility for human error.
Running the analyses
Now the data is in the correct format we can process the data to create metrics such as mean and SD of glucose. To do this, we have chosen the iglu package which can calculate 20+ glucose metrics and can help visualize your data. The package has been developed by a group in the USA and please read the following article for more information:
But to run the iglu package on the glucose data we just processed, you use the following code:
library(iglu)
#This loads the packages but if you need to install it for the first time then use install.packages("iglu")

results_active <- active_percent(gludata)
#This code uses the calculate percent active days function from the package and stores it to an object call results_active

results_metrics.all <- all_metrics(gludata, dt0 = 15, inter_gap = 30, tz = "", timelag = 30, lag = 1)
#This code uses the all_metrics function from the package and stores it to an object call results_metrics.all
#dt0 reflects the time frequency for interpolation
#inter_gap reflects the the maximum allowable gap (in minutes) for interpolation. This can be altered to set your own maximum
#timelag reflects the time in minutes that the rate of change is calculated
#lag reflects an integer indicating which lag in days to use (default is 1)
If you have managed to run the code effectively, you will now have two new objects within the environment. These will contain the processed data for the entire file. In most research studies, researchers aim to process glucose data to understand the variability in glucose for an individual (the entire file). However, in my own research, I aim to understand how glucose data differs daily and the data in it’s current form, doesn’t allow us to do this.
However, we can be clever and edit the file slightly using a bit more code to create unique IDs per day and the rerun the analyses:
gludata <- gludata %>%
  mutate(day = format(time, format = "%d/%m")) %>%
  mutate(id = paste(id,day, sep = "_")) %>%
  select(c(1:3))
#The day = format piece of code inserts a variable that only includes the day and month separated by a /
#The id = paste code joins the id variable with the new day variable
#select removes the new variable from the dataframe

results_active <- active_percent(gludata)
results_metrics.all <- all_metrics(gludata, dt0 = 15, inter_gap = 30, tz = "", timelag = 30, lag = 1)
#These are the same bits of code as used before just now on the updated datframe
If you review the output from the above code, you will now see that instead of 1 row for the ID, there is now 15 which represents the 15 days that the data spans. This now allows us to see how the glucose metrics change over time and between each day.
Conclusion
Whilst this post is one of the longer posts we have developed, processing this type of time series data requires quite a few steps and a few processing decisions. You will have noticed that we haven’t really explained data interpolation or the rate of change aspects we have included above. These are advanced topics that we hope to cover in future feature posts and ones that may be of interest to those that have an interest in measurement and data science.
But to summarize, you should now be able to process glucose data downloaded from LibreView. To process glucose data collected from other devices, hopefully we have given you the necessary tools to edit our code to accomplish this. If not, please reach out to us using the contact us page and we will do our best to help you.
Stay tuned for future posts covering how to interrogate this type of data further and how to use the glucose daily metrics within statistical models.
Complete code
gludata <- read.csv("./static/files/fgmdata.csv", header=FALSE)
#The above code is specific to this post
#First, either create a project and move the downloaded file to your project directory or set your working directory where file are located e.g. C:/Users/username/Downloads
#Then use the read.csv code as in the above referenced post
#We have used the header=FALSE option to import the file as it is

library(dplyr)
#This needs installing via install.packages if you haven't already got the package in your library

pid <- gludata[2,1]
#This is to extract the participant id contained within the file
#If this hasn't been exported in the file or if you have already removed the header manually, this will need to be specified by pid <- "insert Pid" instead

gludata <- gludata %>%
  mutate(V1 = replace(V1, V1 == "FreeStyle LibreLink", pid)) %>%
  slice(-c(1:3)) %>%
  filter(V4 == 0) %>%
  select(c(1,3,5)) %>%
  rename(id = V1, time = V3, gl = V5) %>%
  mutate(gl = as.numeric(gl)*18) %>%
  mutate(time = as.POSIXct(time, "%d/%m/%Y %H:%M", tz = ""))

#replace replaces the data within the device column with the ID of the file - remove if not necessary
#slice removes the top header rows
#filter select only those historic or automatic scans and the variable name could be different depending on your own data
#select then removes all the unnecessary columns that are not needed for analyses by the iglu package (later on)
#rename changes the names of the variables that are required by the iglu package - this is required because we imported the csv as it was. If you remove the headers manually then these the V1 etc variable names will need to be changed
#as.numeric converts the glucose values that are currently stored as characters to numbers
#because iglu was developed using mg/dl values, our data needs to be converted by x18
#as.POSIXct converts the time and date that are currently stored as characters to a date and time variable

library(iglu)
#This loads the packages but if you need to install it for the first time then use install.packages("iglu")

results_active <- active_percent(gludata)
#This code uses the calculate percent active days function from the package and stores it to an object call results_active

results_metrics.all <- all_metrics(gludata, dt0 = 15, inter_gap = 30, tz = "", timelag = 30, lag = 1)
#This code uses the all_metrics function from the package and stores it to an object call results_metrics.all
#dt0 reflects the time frequency for interpolation
#inter_gap reflects the the maximum allowable gap (in minutes) for interpolation. This can be altered to set your own maximum
#timelag reflects the time in minutes that the rate of change is calculated
#lag reflects an integer indicating which lag in days to use (default is 1)

gludata <- gludata %>%
  mutate(day = format(time, format = "%d/%m")) %>%
  mutate(id = paste(id,day, sep = "_")) %>%
  select(c(1:3))
#The day = format piece of code inserts a variable that only includes the day and month separated by a /
#The id = paste code joins the id variable with the new day variable
#select removes the new variable from the dataframe

results_active <- active_percent(gludata)
results_metrics.all <- all_metrics(gludata, dt0 = 15, inter_gap = 30, tz = "", timelag = 30, lag = 1)
#These are the same bits of code as used before just now on the updated datframe